Thursday, July 31, 2008

The Cove and The Splash Pad in Knoxville

We recently visited two kid friendly places in Knoxville with Kaitlyn. While they intimidated her initially, she slowly warmed up to them. I think as she gets older, she'll enjoy them more.


Our first visit was to The Cove off of Northshore Drive in Knoxville. The park is situated on the river and offers a picnic area with charcoal grills (you provide the charcoal), swimming with a small sandy beach and a shaded play area with swings and a large play structure. While the play structure is geared towards older toddlers (probably 2 1/2 or older) and young children, it was still fun to walk around and let Kaitlyn watch the other kids. She also tried the swings for her first time. This park is great because of the shade it offers!


I've heard that The Cove gets very busy on the weekends and on the summer holidays, so if we go again, I plan to go in the morning during the week as I do not think it would be as much fun if it was overly crowded.


Our second visit was to The Splash Pad off of Northshore Drive in Knoxville. This park, part of the Carl Cowan park, is perfect for a hot summer Tennessee Day. It was quite clean and offered plenty of water entertainment for the kids. It has a shaded seating area situated up close to the water area so moms can stay in the shade and closely monitor their kids. The splash pad area is in an enclosed setting so kids can not run away. The kids here appeared to enjoy it tremendously and since admission is FREE, it's a great summer activity.


While we didn't get to visit this park, someone recommended a park off of Watts Road, south of I-40 for young toddlers (1 year plus). The only downfall is that it's not in a shade area, so it's apparently best to go in the morning or evening.

Monday, July 28, 2008

One Dish Meals

Instead of challenging each other this week, Dave and I decided to make two one dish meals based on recipes from Food Network. We selected a rice dish and a fritata.

Dirty Rice with Smoked Sausage
Courtesy of The Neelys
http://www.foodnetwork.com/food/recipes/recipe/0,1977,FOOD_9936_202414,00.html

Please note that we changed the portions slightly and it turned out great!! It's easier than a jambalaya and very tasty with a hint of heat from the cayenne.

Ingredients
1 T vegetable oil
1 lb smoked pork sausage, sliced
1 1/2 cloves garlic, minced
1 large onion, chopped
1 stalk celery, chopped
1 medium bell pepper, chopped
2 cup chicken stock, low sodium
1/4 t cayenne
2 c hot cooked rice (brown basmati rice)
1/4 c chopped fresh parsley
Fresh pepper and kosher salt (we didn't add extra salt b/c of the stock we used)


Follow the instructions as listed on the web site. However, we strongly encourage you to drain the grease after sauteing the pork sausage and before adding the vegetables. The dish turns out great and you don't need the extra fat from the grease.


Fritata - A BUST!
We used a recipe from Food Network, which we decided was simply a glorified omelette and not worth posting as we do not recommend it. If anyone has a good fritata recipe, please feel free to let us know!

$15 Dinner for Three or Four

Pork Tenderloin Served over a Corn/Bean Salad

I found the most expensive part of this meal was the preseasoned pork tenderloin at $6.99 lb, I think I spent $7.23 (just over a pound), but it was worth it as the seasoning adds another level of flavor to the corn/bean salad. The other ingredients are fairly inexpensive and I used the oil, inegar, spices and honey in my pantry. This meal served two adults and miss Kaitlyn, plus we had enough leftovers to feed two adults for lunch the next day.

Ingredients
1 garlic peppercorn tenderloin (preseasoned at store)
1 package frozen corn (10 oz.), thawed
1 can pinto beans, drained
1/4 c. chopped Italian parsley
3-4 scallions sliced thin
1 Roma tomato, chopped
6 T extra-virgin olive oil
5 T red wine vinegar
2 cloves minced garlic
1 teaspoon cumin
10 twists of ground pepper
Kosher salt
Honey (two circles around bowl)

Preheat the grill and grill tenderloin on medium/high heat (closer to high) for approximately 25 minutes. If the tenderloin is 1 1/2 lbs or more, 30 minutes may be more appropriate.

While the pork is on the grill, chop the parsley, garlic, tomato and scallions. Place the thawed corn, pinto beans, tomato, parsley and scallions in a bowl and mix together. Set this mixture aside and prepare vinaigrette. Stir red wine vinegar, minced garlic, cumin, salt, pepper together. Add the EV olive oil and whisk at a fast pace to allow the oil and vinegar to emulsify/blend together.

Set aside 1/4 cup of the vinaigrette and pour the rest in the vegetable mixture and stir. Pull the pork off the grill and allow to sit for five to ten minutes. Place corn/bean salad on plate or in a low bowl and lay slices of pork on top. Drizzle with vinaigrette and serve.

You can make the corn/bean salad ahead of time if you wish. Bon apetite!

Friday, July 25, 2008

Pennies - Kid Friendly Food

Growing up, my sister and I often ate pennies. It only seemed right to let Kaitlyn try this simple dish as well.
Pennies Recipe
1 thawed turkey dog (hot dog is what I ate as a kid)
1 T olive oil
Ketchup
Optional: brown sugar
Heat olive oil in skillet over medium heat. Slice turkey dog/hot dog into round pieces that resemble the size/shape of a penny. The slices can be as thick or thin as you wish.
Add the turkey dog to the skillet and saute in olive oil for two to three minutes. Add a tablespoon of ketchup to start and add more if deemed necessary. You want each piece of turkey dog to be coated with ketchup on all sides. If you want to sweeten the dish, add brown sugar (we didn't think it was necessary for Kaitlyn).
Saute the turkey dog with ketchup for another two minutes until the ketchup has darkened slightly and has a color closer to barbecue sauce. Surpisingly, the tartness in the ketchup diminishes and becomes sweeter after adding the heat to it. The ketchup provides a darker, richer flavor (think milk chocolate compared to dark chocolate) on the turkey dog than regular ketchup provides.

Serve penny size or cut smaller for little ones.*

* Stand by with a wet paper towel or napkin as these are messy if your little one is still eating with his/her hands.

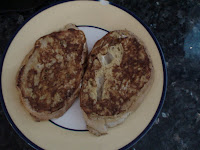
Breakfast Treat for Kids - French Toast

While Kaitlyn's grandma visited, she tried French Toast for the first time. As you can see by the photos, she really enjoyed it!
I recognize that French Toast has probably been around for decades, if not centuries, but below is the recipe that my mom used to teach me to make French Toast. The key ingredient is CINNAMON!
French Toast
Quantity: 4 slices

4 slices of French Bread (may substitute wheat - makes it a little heavier)
2 eggs
Milk (1/8 - 1/4 cup)
1 t. vanilla (not imitation)
2 t. cinnamon (or more)

Crack the eggs in a shallow bowl and stir. Add 1/8 - 1/4 c. milk to the eggs - you want the milk to lighten the eggs to a light yellow, but not cream or white as that means too much milk. Stir in the vanilla and cinnamon.

Heat a skillet over medium/high heat on the stove and use Pam or butter to coat the skillet. Next, coat each side of bread with the egg mixture by laying it flat in the bowl. Use a fork to flip it to avoid messy fingers and ensure both sides of bread are completely covered in the egg mixture. Lay the bread in the skillet and allow to brown on one side before flipping to the other side. I do not give cook times because every stove is different, just use a fork or flipper/turner to lift up a corner of the french toast to check if the side has browned enough before flipping it over.

Pull french toast from the skillet when both sides are light brown and crispy. Serve with a light dusting of powdered sugar or dollop of maple syrup. Enjoy!!


Tuesday, July 8, 2008

Swimming - Fun Summer Activity


Once the weather warmed up, we decided to expose Kaitlyn to the water. Yes, we've bathed her over the last year, but she's never experienced water in a pool or lake. Our first trip to the local pool brought out lots of tears as we discovered Kaitlyn did not want to get in the water. Since we expect to spend a lot of time at the pool this summer, we signed up for a four course class at the YMCA in June for $35 to help her adapt to the water and pool.


It worked! By the end of the class, she was comfortable getting in the water with mommy or daddy, holding on to the side of the pool, getting her hair wet and evening holding her breath when we quickly dipped her face under water (this was done in a nice way, we promise!). We opted not to sign her up for additional courses until she is older and can really learn to swim.


Things we recommend:


  • Get in the water with your child; having both parents helps if feasible

  • Find a pool or lake where the water temperature is warm; we're convinced the water was to cold the first time we took Kaitlyn

  • A swim diaper is better than a regular diaper (her swim suit had it built in, which was very convenient)


  • Know that your child probably won't learn to swim if he/she is under two (not fact, just opinion from watching Kaitlyn and other little ones in the pool)


  • In deep water, put your baby in a Coast Guard Approved life jacket as it's hard to tred water and hold a baby


  • Consider a life jacket that will keep your baby afloat and keep his/her face out the water


  • Have fun and don't be afraid to slowly try new things like helping your baby float on his/her back, splash in the water, kick his/her feet, blow bubbles in the water, etc.


Note: A parenting publication (can't remember which one) recently published an article that indicated taking babies swimming in a pool or lake who are less than a year old may cause an increase in ear infections. Just something to research if you're thinking about swim lessons or if your baby has ear trouble already.

Flat Iron Steak - Great price, but what is it and is it any good?


I was shopping at our local grocery store and saw the Flat Iron Steak on sale for $2.99/lb. Given that it's not in my budget to buy a filet mignon every week, we like to try different cuts of steak - flank, skirt, rib-eye, etc.. While Dave enjoys a T-bone or New York Strip, I always go back to the filet. So, seeing this new cut in the store, I thought we'd give it a try.

A Flat Iron Steak, or top blade steak, is cut from the shoulder of the cow in a particular manner as to avoid connective tissue (gristle) running through the meat. It is said to be close to the filet in tenderness (not quite though), as tasty as any other cut of meat, and great for marinating. Visit the links below to learn more:

We used the following recipe for a marinade and will grill it tonight. Stay tuned for how things turn out...


Marinade Ingredients

1/4 c. Olive oil

2 T. Balsamic vinegar

2 Garlic cloves (I used 3)

1 t. Italian seasoning

1/2 t. Favorite all-purpose seasoning blend (I used Montreal Seasoning)

Salt and ground black pepper to taste

The marinade listed above was okay. It didn't impart much flavor, just a hint and I marinated it for four hours. However, on Saturday, we used the Flat Iron Steak for fajitas and used half fajita half burrito seasoning to flavor it, which was much better. If you have a great steak marinade, please feel free to share in a comment!


Cutting instructions: Cut crosswise into think slices.

Did we like it?

Yes. Overall, I would recommend trying the Flat Iron Steak. The texture was better than a flank steak - not as chewy. It was definitely more tender than most steaks, but it did not melt in my mouth like a filet. I couldn't really expect that for the price. I appreciated that it didn't have much gristle, since I don't enjoy fatty, gristly steaks.

I think you could easily substitute the Flat Iron steak for flank or skirt steak in a recipe and enjoy just as much if not more.